Showing posts with label tips. Show all posts

Monday, 13 March 2017

Windows Service - How To Setup Email Notification On Service Failure

Problem:

We have designed a scheduler engine, which runs as a windows service and is used for executing different kinds of scheduled tasks. At times, the service stops and we get to know that only when some users complain of not being able to see the outcome of a scheduled task. Since then we have put this scheduler under the monitoring checklist, so that the windows monitoring team have a check on this service. But it would be even more effective, if this is automated. Wonder if Windows offers an easy way of setting up an alert on service stoppage.

Solution:

Windows does offer an option to configure email notification for one or more specific events occuring. If you have built your service application to handle the exceptions and write the exception information into the windows event log, then the easier approach is to leverage the windows event notification. If you have not aready used the Windows event log, in your service application, it is recommended to do so, as windows event log is the best place to look for errors and other events. Check out Stuart Lange's article on Handling Windows Service Errors. It is a series of six articles and you may want to check out all of them. Check out the Technet article Configure Notification Options to know more about setting up email notifications using the Windows System Resource Manager.

Just in case, you don't have the option of leveraging the Windows System Resource Manager as above, then you may make use of the Recovery options under the service properties dialog. You may double click on your service on the services console window and you will see a Tab named Recovery. The Recovery option enables you to specify a recovery action three times. See the figure below:


As you may observe, you four options to choose when a service fails: Take No Action, which is the default; Restart the servive; Run a program; and Restart the computer. While Restarting the computer is not a good idea if the computer also serves various applications and services, Though you have option to specify a delay for restart and
to send out messages to other connected computers that the computer is being restarted.


But certainly Run a Program option can be leveraged to send out an email notification. You may also notice that you have option to specify different actions for the first, second and subsequent failure. It would be a good idea to to try restarting the service atleast once or twice and then try using a custom program to send out an email notification. The custom program can even be a Power Shell script.

A simple PowerShell script to send out email notification could be as below:

$Username = "MyUserName";
$Password= "MyPassword";
$message = new-object Net.Mail.MailMessage;
$message.From = "YourName@gmail.com";
$message.To.Add($email);
$message.Subject = "subject text here...";
$message.Body = "body text here...";
$smtp = new-object Net.Mail.SmtpClient("smtp.gmail.com", "587");
$smtp.EnableSSL = $true;
$smtp.Credentials = New-Object System.Net.NetworkCredential($Username, $Password);
$smtp.send($message);


While there are more ways you can handle this problem, I hope this helps you to 

Sunday, 12 March 2017

MS Excel - Copy Sum of Selected Cells

Problem:


Mirosoft Excel is a wonderful office product and is an essential tool in our work life for most of us. But still many would have not discovered its capabilities to the fullest. Here is a problem that I wanted to solve. Typically, techies don't like to do same thing repeatedly and would look for a possible shortcut for that. I have been working through multiple excel sheets, where in have to find totals for a group of cells, without any specific parameters to determine the qualifying cells. If there is a shortcut to accomplish this it would be of help to many.


Solution:


Given that there are no parameters that determine the qualifying cells, it is difficult to come up with a an algorithm to automate the selection and totalling. But it would be possible to leave the selection to the users and then facilitate the summing part. We can leverage the clipboard to achieve this. Let the users select the desired cells and then invoke the macro using the assigned short cut key combination and the total is copied into the clipboard and available for pasting any where.

Here is the macro that does the work:

Sub mySum()   
 Dim MyDataObj As New DataObject   MyDataObj.SetText Application.Sum(Selection)   MyDataObj.PutInClipboard 
End Sub

I am sure every one knows how to create a macro and assign a short cut key for it. You may find a lot of resources on creating a macro in excel.

Saturday, 11 February 2017

MS Excel - How to get rid of the GetPivotData function in formulas?

Problem:

Have you tried copying a formula involving cells within a pivot table? You may find that the the value in the target cells don't change. You may also notice that the formula doesn't refrerence the cells in the usual way like A1, C2, etc. Instead, it uses the GetPivotData function. for example when I tried creating a formula adding J4 and I4 and that both J4 and I4 within a Pivot Table. But the formula you see in the target cell is something like the one below:

=GETPIVOTDATA("Sum of Dec'16"|$A$3|"Group"|"Administrative Expenses")+GETPIVOTDATA("Sum of Nov'16"|$A$3|"Group"|"Administrative Expenses")

As copying this formula to the adjoining cell does not change the cell reference and as such the value doesn't change. How do we workaround this issue?

Solution:

I am sure while creating the formula, you would have used the mouse to select the cells referenced in the formula. Try just typing the cell references in the formula without using the mouse. For instance, just type '=J4+I4' and there you go, the formula remains as it is and at this instance you don't see the reference to the GetPivotData function. Now you copy this formula to the adjoining cells and it works as usual and no issues. So the issue is when you select the cells referenced in the formula using the mouse / touch pad.

Now why Excel behaves like this, we don't know. However, if you don't like this behavior and permanently disable this you need to do this. It's simple.

Bring up the Excel Options by clicking on File --> Options menu. May be, there are different ways of reaching out to the Excel Options in different versions of Excel. Under the Formulas Tab, you will find a check box 'Use GetPivotData functions for Pivot Table References' under Working with formulas section. Given below is a screen shot of Excel 2016.


There you go, just uncheck this checkbox and Excel won't use the GetPivotData function any more.


Saturday, 10 September 2016

ASP.NET - Setting HTML Meta tags in content pages

Problem:


Though the @Page directive in a content page allows one to specify the Description and Keywords attrubutes, the same is ignored when the page is rendered. Instead the Description and Keywords as specified in the master page is what gets rendered as part of the final html output. Is this the intended design and is there a solution to work around this issue?


Solution:


By design, the HTML Meta tags specified in the content page is ignored when the page is rendered. In this context it is important to understand the following:

  • The Master page contains the <head> tag of the page and not the content page. As such the meta tags specified in the master page will prevail.
  • The Content page derives the System.Web.UI.Page class, which though recognizes the Title attribute provided as part of the @Page directive, it does not recognize the other meta tags like description and keywords.
  • The master page and content page are dendered in teh following order:
    • Content Page PreInit event
    • Master Page Init event
    • Content Page Init event
    • Content Page Load event
    • Master Page Load event

As you may observe, while the Load event of Master page happens after that of the Content Page, the Init event of the Master page happens ahead that of the content page.  Given that the Master page loads after the content page, you can manage to use the Title attribute specified in the content page using the script tag within the <title> element, as below:

<title><%: Page.Title %></title>


You cannot however handle the Meta tags in the same way. One solution to handle the Meta tags specified in the Content page is to use a custom Page class, which extends the System.Web.UI.Page class, wherein add support to handling the Description and Keywords as input in the @Page directive. This can be accomplished by adding appropriately overriding the OnLoadComplete event of the Page class, wherein the needed Meta tags are constructed using the values specified in the @Page directive and the same are added to the Page Header.

Check out this codepage link for a sample solution.

Sunday, 29 November 2015

How to Create '|' (Pipe) Delimited Files in Excel

Problem:

Microsoft Excel is a very useful tool for data analysis. It supports import of data from various sources and formats into it for analysis. But, though it supports export of data in various common formats, it does not natively support export of data in a delimited text format with the delimiter other than Comma and Tab characters. This post explains how to get the excel data exported into a "|" (pipe) delimited text file.

Solution:

Excel does not directly support export or saving the data delimited with a pipe or such other characters. It supports comma delimited files (.csv) or tab delimited files though. The csv file generator however uses the List Separator as set in the windows Regional Settings as the delimiter. With this you can change this value in the regional settings and the csv file option will now produce a delimited file with the delimiter of your choice as set in the regional settings. For those not familiar with the regional settings, here is how to get this accomplished:

If you are using Windows 8 or 8.1, you will find the Regional Settings option under the "Clock, Language and Region"  category.


Click on the Additional Settings button in the Formats tab of the Regional Settings dialogue box. In the Numbers tab of the resulting dialogue box, you will find the field List Separator (Highlighted in the image. By default, it displays ","(comma). Now set it to a character that you need the files to be delimited with. For instance, if you want export a pipe delimited text file from excel, enter the charcter "|" in this field and apply the change.


You are done. Close and re-open Excel with the data that you want to export. Now use the Save As option to save the sheet as a csv file (.csv). This will now produce a text file delimited with the pipe character. Unless you regularly use pipe as the delimiter, you may want to set it back to comma, so that it does not impact any other operations that dependent on the List Separator field.


Friday, 6 March 2015

Whitelisting email or domain in Gmail

Question:

How to whitelist or blacklist an email domain in gmail?

By: Radhakrishnan Ravi


Answer:

Google has a might spam handler and does a very decent job. However, if you want to put a rule to either whitelist or blacklist, use the filter options provided under settings menu. It is simple and the following steps will take you through in implementing a filter of your choice.

Choose the Settings menu from the Settings drop down menu on the top right beneath your profile picture.


Select the Filter Tab, which will list the filters and will have a link at the bottom captioned ''Create a New Filter". As you may observe, you have an option to import filters as well using the "Import Filter" link.


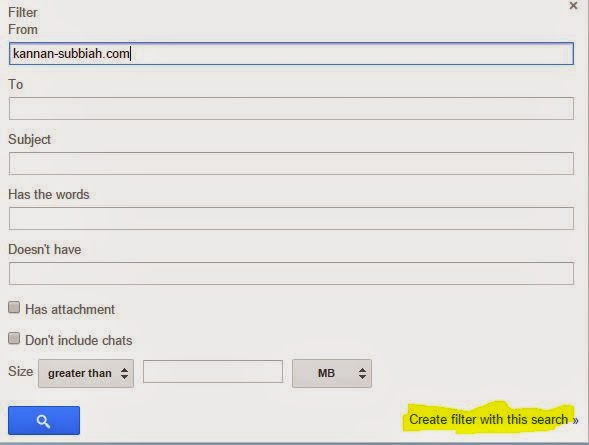
Clicking the create filter will take you to the advanced search window as in the image on the right. Alternatively this search window can be accessed using the tiny drop down icon provided on the right side of the search box within gmail. Basically, you will have to decide on the search criteria to apply the filter for. i.e, if you want to whitelist the domain kannan-subbiah.com, enter the domain name in the From field of the search window. Upon entering a valid search criteria, you will find the link "Create a filter with this search" enabled.


Click on this and you will see a Filter Dialogue window as in the image on the left. The options provided are self explanatory and choose appropriate action you want to apply for the chosen search criteria. For instance, if you want to white list the entered domain, select the option "Never send it to Spam" and then click on the Create Filter button at the bottom. Similarly, if you want to permanently delete emails from a specific sender, you may choose the delete option here.

The filters so added will appear in under the Filter tab of the settings screen. You will then have the option to remove or modify the filters  as well.

Sunday, 9 November 2014

Microsoft Expression Encoder

This post is not in response to a specific problem or question, but could be a response to a potential question from some one.

I was looking for a cost effective and easy to use tool for capturing screens and produce videos. There are many tools, in the freeware, shareware and commercial category for the purpose. But the one that I find interesting is the one from Microsoft, the Expression Encoder. While Microsoft has stopped supporting the commercial version of the product, the same is available as a free download. I am sure, many of you might know about this, but for those who are not, this post will give a glimpse, so that one can start using it and see its advantages.

Expression Encoder Pro is a component of the Expression Studio, which is currently not sold as a product. In addition to Expression Encoder Pro, the studio also bundles with it Expression Web, Expression Blend and Expression Design. Expression Web is intended for creation of responsive websites leveraging CSS3 and HTML5. Expression Blend is intended to build interactive UI for windows store applications. Expression Design, combined with Expression Blend and Visual Studio helps building innovative, user-centric, fast and fluid applications. Check out more about the changes and availability of Expression products on the microsoft site.

Let us look at what Expression Encoder can offer us. Expression Encoder 4 Screen Capture is also installed along with the Expression Encoder 4. The Screen Capture component offers you to record videos using the camera attached to the device / PC, record audio using the microphone, and to record the selected area of the screen.


On clicking the Record button, you will be prompted to select a rectangle area to capture and once done, you can continue with your actions on the screen as the recording continues.Once, done, you stop the recording and the output is produced as a .xesc file, which can be further edited using the Encoder.

To get your captured video encoded into a video output, you will perform the following using the Expression Encoder

  • Choose your project. 
  • Import your source video. 
  • Modify your video. 
  • Set preview and encoding options. 
  • Choose an output format. 
  • Render your video.
Getting used to was not very difficult and the product comes with a useful help document. The tool allows you to overlay visual still and moving image file, edit the sub titles, captions and descriptions, add audio streams, apart from allowing you to insert and cut parts of the source video.


Few of the limitations include, inabitlity to add more than one overlay, the supported output format limited to Windows Media Video (.wmv) and IIS smooth streaming. While the tool has much more capabilities, for the specific purpose of creating product demo or tutorial videos, this suits very well. As you know there are many tools out there to convert .wmv to other video formats, like .mp4.

Try it out and share your feedback here.

Thursday, 6 November 2014

Windows Steps Recorder - For Problem Reporting

Question:

I work in QA department, where reporting issues and defects with all supporting details to well describe the problem is key. We usually use a screen capture tool to capture the images, but then to assemble them as a problem report, we need to depend upon MS Word or such other tool. I am writing to you to check if there is a better tool that helps to perform this task even better.

By: Krishnan Sadasivam

Response:

If you are asking about a tool for screen capture, Snipping tool, which is part of Windows OS from version 7 onwards is a nice tool to capture parts of the screen. There is another tool which again is part of the Windows OS from version 7 upwards, which is called 'Steps Recorder'. This tool captures your actions and associated screen and produce a descriptive output, which will make it a lot easier for the problem reporter and the problem sover. Here is how it works in Windows 8 or 8.1:


  • Press Windows Key+Q to bring up the search panel on the right.
  • Type steps and you will see the "Steps Recorder" tool show up in the search results
  • Click on it and it will launch the Steps Recorder Tool

  • Click on the Record button and then start reproducing the problem you want to report. 
  • As the recording is in progress, you have the option of adding comments to certain specific area of screen by highlighting it.
  • Once done click on stop recording and your actions is compiled as multiple steps and optionally as a slide show.


  • You have option to save the steps as a compiled html and email it as well.


This free tool will certainly be handly for reporting computer software problems.

Sunday, 2 November 2014

Excel Pivot & Shortcut Keys

Question:

I understand Microsoft Excel is a good start for analytics on data. Please direct me as to how to create a basic Pivot Table. You may also share me any tutorial references to learn more on Pivot feature in Excel. Also share Short Cut keys in Excel

By: Vinay Kumar

Response:

Learning to create a Pivot is fairly easy but the tough part is to know how you want the data to be presented in the Pivot. For this you need to know a good understanding of the data on hand and what you want out of the data. For this question, I assume that you are already clear about your needs.

Here is how you can quickly get a Pivot of your Excel Data:

  • Select the data range that you want to apply Pivot on and then click on the Pivot button, which is in the Toll bar ribbon under the Insert Menu. You may also use the short cut key Alt + NV
  • This will open up the Pivot dialog window where you will have option to adjust or change your your data range (as you may observe, you can also use an external data source by choosing the appropriate option) and other options.
  • Clicking ok on this dialog window will open up the Pivot table in a new work sheet (default option) and will show the Pivot Table Fields task pane on the right side. You can drag and drop the fields into Filters, Columns, Rows and Values. 
    • FILTERS: This area contains the fields that enable you to page through the data summaries shown in the pivot table by filtering out sets of data — they act as the filters. For example, if you designate the Year field from a data list as a report filter, you can display data summaries in the pivot table for individual years or for all years represented in the data list.
    • COLUMNS: This area contains the fields that determine the arrangement of data shown in the columns of the pivot table.
    • ROWS: This area contains the fields that determine the arrangement of data shown in the rows of the pivot table.
    • VALUES: This area contains the fields that determine which data are presented in the cells of the pivot table — they are the values that are summarized in its last column (totaled by default).
  • Set these in the way you want and your Pivot table is ready.

To know more about other complex and advanced features of the Pivot Table, check here.

Here is a nice Cheat Sheet containing all the Short Cut keys for Excel. If you are a key board expert, then you will want to check out this as well.


Sunday, 29 June 2014

Administration of Vodafone HG556 Router

Question:

I have a Vodafone HG556a router, which I was using while I was in Ireland with Vodafone network. This router has a USB port and as well as an ADSL port. So I thought that this router can be used back in India with BSNL or such other ADSL Networks in India. When I login to the router with the given default password, I could only see the basic settings and I could not see menu / options to setup the mac filtering and other advanced security settings. I searched google and figured out that there will be a different credential to get into the advanced settings. I tried with the default admin credientials but it does not work. Any help that you can offer here will be of great use for me.

By: Sreekumar Rajan


Answer:

Luckily, I too have a similar router and so I am sure I can help you here. Basically, these routers are locked with the network service providers and hence for any advanced setup, you may have to reach out to their customer service, who will be able to reconfigure your router remotely. Don't worry, there is a way to get the admin credentials and you do not have to reach out to the customer service team of Vodafone (overseas).


I assume that you have your basic user credentials. If not, you may perform a hard reset of the router and then look for the credentials
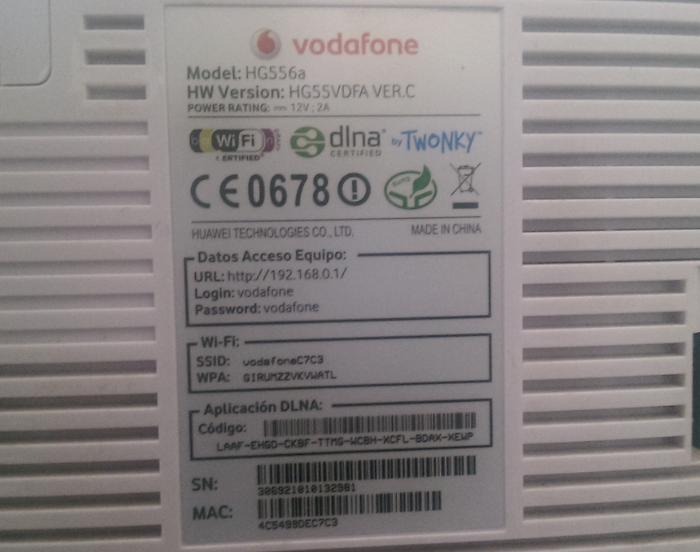
on the back of the router. Usually, the default basic credentials are mentioned in the router itself, if not you may consult the user guide if any that came with the router. The defualt user name is 'vodafone' and the default password is also the same - 'vodafone'. Refer the image, which is that of my Vodafone router and you can see the defaults printed there in.


You connect your router to your laptop or desktop using ethernet cable and login into the web administration of the router using the default IP of 192.168.0.1. Alternatively, you may connect through wifi as well, using the default SSID and the WPA as printed at the back of the router. Type the URL http://192.168.0.1/en_US/backupsettings.conf on the browser after logging in with the basic credentials.


This will prompt you to download the settings file and depending on your browser settings, allow the download into a desired location. This settings file is basically in xml format and so, you may open this using notepad or wordpad. Search for the word 'syspassword' and you will see the admin password as in this image. You may observe that the value for the key sysPassword in this case is "VF-456gIr". This is the password for the user 'admin'. Log out of the basic user login and then login again using the admin credentials as retrieved above and you are now on course to perform advanced setup tasks on your router.

It may be possible that the firmware version of your router may be different and in that case, there is a possibility that this technique might not work for you. If so, share with me more details about your router and I can see if some help is available elsewhere.

Saturday, 26 April 2014

Start PXE Over IPv4

Question:

My six months old HP Laptop which was working fine all along, once did not boot and I could see the text "Start PXE over IPv4" in the black MS DOS like screen and was unresponsive to keyboard and mouse. I waited for some time and then used the power button to hard shut down and then powered it again. This time it booted normally without any issues. Though the problem did occur thereafter, I am curious to know what PXE is all about. Can you explain what it is and the reason for it showing up?

By: Anonymous

Answer:

PXE is the short form for Preboot Execution Environment.It allows PCs or laptops to boot over a network as against booting from the local hard disk. Those who have worked with Novell Netware should be familiar with this network booting, where the Network Interface Cards carry a small add on chip containing the Network Boot Program, which will perform the boot over the network.

To address the large deployment challenges, Microsoft began developing the technology that would allow for network-based installation and PXE was the solution for this. To PXE boot a PC, the BIOS should be setup to boot from network. When set so, the BIOS will first get an IP address for the PC from the PXE Server and thereafter to get the boot image using TFTP on to the RAM and then boot out of that image.

Now in your case, as you have described the issue, it just happened, without you changing any BIOS setting. Normally the BIOS have multiple boot options configured with an order of priority. Your BIOS probably had the Network boot as one of the boot options and on that occasion, for some reason, your hard drive would have been unresponsive for a moment at the time of boot, as the next choice, the BIOS would have attempted to boot from network using PXE. As it might not find a PXE server over the IPv4 network it stayed there. 

You can check the BIOS by pressing F2 when your laptop boots and check if the network boot is configured as an option. You may disable this option, if you are not using the Network booting in your environment. On a different note, you may want to check why your local hard disk was not responsive for the boot on that occasion. That could be an odd occurrence and  the disk may be just fine too.

To know more about PXE booting, check the following resources:

Sunday, 24 November 2013

Chrome on Windows 8 Freezes often

Question:

I have been experiencing issues while using Chrome on Windows 8. Randomly the system PC become unresponsive to keyboard and mouse. While some times the freeze is for a few seconds, most of the times it never comes back. The PC then had to be hard rebooted. Though I have been experiencing more with Chrome on rare circumstances, the system did froze even when I was not using Chrome at all, For your information, I have applied all windows updates and the device drivers seem to be upto date. Any help in resolving this is highly appreciated.

By: Mohan Ramalingam


Answer:

There is no straight fix for this problem, as the cause for this issue could be many fold. For example, I have come across issues around solid state disks with inappropriate hardware and driver configurations. Generally, try these fixes and one of that could work for you.

  • Run the following command bcdedit /set disabledynamictick yes using the command prompt as an administrator and then reboot the system. Dynamic ticks, which exists in Linux for over a decade, is implemented in Windows 8 for the first time. This does not significantly benefit desktops, but mobile devices such as laptops, smartphones and tablets, are expected to be benefited in the form of extended battery life. Unfortunately, Microsoft’s implementation of dynamic ticks in the Windows 8 kernel does not go well, may be due to its dependency on some hardware devices and/or related drivers and thus causing the issue that you have described above. Disabling this on a desktop is unlikely to have any significant adverse impact.
  • It is widely reported that using a solid state disk with older SATA controllers, which are not designed to manage the higher speeds of SSDs could also cause similar issues. It is recommended to use SATA II controller based mother boards. Just in case if you are using an SSD, you may want to check the underlying hardware specifications and fix them if needed.
  • Other possible solutions include:
    • If the issue is specific to chrome, try disabling the chrome extensions on a trial and error basis and some users how found success in resolving the issue by disabling some of the fixes.
    • Ensure that all your hardware devices have latest drivers supported by Windows 8.
    • Run System File Checker tool to see if there are corrupt system files. For this, you may run the command sfc /scannow in a command prompt with administrator privileges. This will report if there are issues with system files and if so, you may want to reinstall or reset the Windows 8 operating system.
    • Defrag your hard drives
    • Clear history and temporary files

You may write a response to this post in the form of comments, if any of the above has helped resolve your issue.

Update:

If your experience of freeze is not specific to Chrome or any one application, then you have reason to suspect the hardware. Overheating CPU has been found to be one of the most common cause of such freezes. Ensure that the fan mounted on the Processor and other fans attached to the chassis are working fine. Use the hardware monitoring tools supplied by the manufacturer to keep a watch on the CPU temperature.

The next possible cause would be incompatible drivers. Ensure that you have all the hardware drivers updated. Usually, when you have upgraded your Windows 7 to Windows 8, it might be possible that the old drivers continue to be in use and Windows OS might not find updates. But driver updates could in fact be available from the device manufacturers. Better search for the appropriate updated drivers and apply them.

Saturday, 28 September 2013

Setting up Second Wi-Fi Router to LAN

Question:

My office has two sections operating on different floors of the building. We are using a Wi-Fi router for our office LAN & Internet access, but the range of this router is not enough to support the other floor area. We understand that connecting another router would need a different subnet and what we need is just a switch. Is there a way to have the second router setup to just function as switch?

By: Arun Viswa

Answer:

While there are specific devices that will meet this requirement, yes, this can be achieved using Wi-Fi routers as well (Some routers may have hardened the configuration and thus restricting this ability). The routers have the switching function within it and you just need to use the switching function alone. You can achieve this by configuring your second router as below: For this purpose, let us assume that your first router is setup to have your office network as 192.168.3.0 / 255.255.255.0 with a gateway address as 192.168.3.250 and DHCP Server enabled for a range of IP addresses.


  1. Some routers automatically setup the WAN port upon connecting the network cable on the WAN port. And so, do not connect your network cable into any of the ports yet.
  2. Just connect a PC or Laptop to one of the LAN ports(usually numbered) and just go to the LAN setup section using the web based setup portal. Usually this can be accessed using the URL http://192.168.0.1. Consult your router manual for the default IP and the admin credentials.
  3. Disable the DHCP Server and assign a static LAN IP within the same subnet, that is outside the DHCP range of the primary router. In our case, let us assign 192.168.3.255 with the same subnet and gateway as that of the first router.
  4. Now connect your LAN cable from the first router into another numbered LAN port(not the WAN port).
  5. Make sure that your primary router's DHCP range is wide enough to support the number of computers and devices that you would be connecting from both the floors of your office.


Incidentally, if you setup your Wi-fi with the same SSID and security setup as that of your first wi-fi router, you have wi-fi roaming also working. i.e. your office wi-fi devices configured to connect to your first router will automatically connect to the second router when they move into the wi-fi range of second router. Please note that as I have indicated, some router's have pre-configured firmware restricting this kind of setup.

You can always reach me for further clarification on this.

Saturday, 21 September 2013

How to take Screen Shot in Android Phone?

Question:

I have seen my friends taking and sharing screen images using their iPhone. While I think that this should be possible in Android Phones as well, I could not figure out how to take screen shots in my HTC One M7 running Android Jelly Bean.

By: Niranjan Babu

Answer:

Yes, Android natively supports taking screen shots in Ice Cream Sandwitch and Jelly Bean versions. It is not an explicit menu or a built in app though. The trick is that while you are at a screen that need to be framed, press and hold the Power button and the Volume Down button simultaneously. You may have to hold press and hold these buttons for about two seconds or little more, until you hear the camera click sound and visually see the screen being framed and saved into the Pictures/ScreenShots folder. Some specific vendor tweaked versions may have explicit touch buttons within certain applications.

For those who are using older Android versions like Gingerbread or earlier, then you are left with the option of using an application. You may search through the app store and find as many applications that facilitate taking screen shots. Beware that some of such apps may require you to root your OS, which is not recommended as certain manufacturer specific features may stop working once you root your phone.