Monday 13 March 2017

Windows Service - How To Setup Email Notification On Service Failure

Problem:

We have designed a scheduler engine, which runs as a windows service and is used for executing different kinds of scheduled tasks. At times, the service stops and we get to know that only when some users complain of not being able to see the outcome of a scheduled task. Since then we have put this scheduler under the monitoring checklist, so that the windows monitoring team have a check on this service. But it would be even more effective, if this is automated. Wonder if Windows offers an easy way of setting up an alert on service stoppage.

Solution:

Windows does offer an option to configure email notification for one or more specific events occuring. If you have built your service application to handle the exceptions and write the exception information into the windows event log, then the easier approach is to leverage the windows event notification. If you have not aready used the Windows event log, in your service application, it is recommended to do so, as windows event log is the best place to look for errors and other events. Check out Stuart Lange's article on Handling Windows Service Errors. It is a series of six articles and you may want to check out all of them. Check out the Technet article Configure Notification Options to know more about setting up email notifications using the Windows System Resource Manager.

Just in case, you don't have the option of leveraging the Windows System Resource Manager as above, then you may make use of the Recovery options under the service properties dialog. You may double click on your service on the services console window and you will see a Tab named Recovery. The Recovery option enables you to specify a recovery action three times. See the figure below:


As you may observe, you four options to choose when a service fails: Take No Action, which is the default; Restart the servive; Run a program; and Restart the computer. While Restarting the computer is not a good idea if the computer also serves various applications and services, Though you have option to specify a delay for restart and
to send out messages to other connected computers that the computer is being restarted.


But certainly Run a Program option can be leveraged to send out an email notification. You may also notice that you have option to specify different actions for the first, second and subsequent failure. It would be a good idea to to try restarting the service atleast once or twice and then try using a custom program to send out an email notification. The custom program can even be a Power Shell script.

A simple PowerShell script to send out email notification could be as below:

$Username = "MyUserName";
$Password= "MyPassword";
$message = new-object Net.Mail.MailMessage;
$message.From = "YourName@gmail.com";
$message.To.Add($email);
$message.Subject = "subject text here...";
$message.Body = "body text here...";
$smtp = new-object Net.Mail.SmtpClient("smtp.gmail.com", "587");
$smtp.EnableSSL = $true;
$smtp.Credentials = New-Object System.Net.NetworkCredential($Username, $Password);
$smtp.send($message);


While there are more ways you can handle this problem, I hope this helps you to 

Sunday 12 March 2017

MS Excel - Copy Sum of Selected Cells

Problem:


Mirosoft Excel is a wonderful office product and is an essential tool in our work life for most of us. But still many would have not discovered its capabilities to the fullest. Here is a problem that I wanted to solve. Typically, techies don't like to do same thing repeatedly and would look for a possible shortcut for that. I have been working through multiple excel sheets, where in have to find totals for a group of cells, without any specific parameters to determine the qualifying cells. If there is a shortcut to accomplish this it would be of help to many.


Solution:


Given that there are no parameters that determine the qualifying cells, it is difficult to come up with a an algorithm to automate the selection and totalling. But it would be possible to leave the selection to the users and then facilitate the summing part. We can leverage the clipboard to achieve this. Let the users select the desired cells and then invoke the macro using the assigned short cut key combination and the total is copied into the clipboard and available for pasting any where.

Here is the macro that does the work:

Sub mySum()   
 Dim MyDataObj As New DataObject   MyDataObj.SetText Application.Sum(Selection)   MyDataObj.PutInClipboard 
End Sub

I am sure every one knows how to create a macro and assign a short cut key for it. You may find a lot of resources on creating a macro in excel.

Saturday 11 February 2017

MS Excel - How to get rid of the GetPivotData function in formulas?

Problem:

Have you tried copying a formula involving cells within a pivot table? You may find that the the value in the target cells don't change. You may also notice that the formula doesn't refrerence the cells in the usual way like A1, C2, etc. Instead, it uses the GetPivotData function. for example when I tried creating a formula adding J4 and I4 and that both J4 and I4 within a Pivot Table. But the formula you see in the target cell is something like the one below:

=GETPIVOTDATA("Sum of Dec'16"|$A$3|"Group"|"Administrative Expenses")+GETPIVOTDATA("Sum of Nov'16"|$A$3|"Group"|"Administrative Expenses")

As copying this formula to the adjoining cell does not change the cell reference and as such the value doesn't change. How do we workaround this issue?

Solution:

I am sure while creating the formula, you would have used the mouse to select the cells referenced in the formula. Try just typing the cell references in the formula without using the mouse. For instance, just type '=J4+I4' and there you go, the formula remains as it is and at this instance you don't see the reference to the GetPivotData function. Now you copy this formula to the adjoining cells and it works as usual and no issues. So the issue is when you select the cells referenced in the formula using the mouse / touch pad.

Now why Excel behaves like this, we don't know. However, if you don't like this behavior and permanently disable this you need to do this. It's simple.

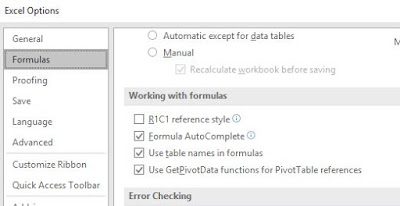
Bring up the Excel Options by clicking on File --> Options menu. May be, there are different ways of reaching out to the Excel Options in different versions of Excel. Under the Formulas Tab, you will find a check box 'Use GetPivotData functions for Pivot Table References' under Working with formulas section. Given below is a screen shot of Excel 2016.


There you go, just uncheck this checkbox and Excel won't use the GetPivotData function any more.


Saturday 21 January 2017

Bootstrap Carousel - Different intervals for differnet slides

Problem:

Bootstrap Carousel is an easy and convenient option for implementing a slider on your website. But is there a way to advance the slides with different time intervals. For example, slide 1 will advance after 10 seconds, the second slide after 5 seconds and slide 3 to advance after 3 seconds. I came across a scirpting suggestion using the the carousel method with the 'pause' parameter. i.e. Pausing the slide advancing for amount of time computed as the slide timer as reduced by a the interval. But for some reasons this solution wasn't working for me. But I could have it working with a different approach, which is explained below, so that this will be useful for others as well.

Solution:

Instead of using the pause attribute, I tried using a script to advance the slides. i.e. advance the slides manually by calling carousel method the 'next' attribute. This can be accomplished in combination with the setTimeOut function. For e-g, something like this should help in having this working.

    var t;
    var start = $('#myCarousel').find('.active').attr('data-interval');

    t = setTimeout(function () { $('#myCarousel').carousel('next') }, start);

The block above will ensure that the first slide advances after the interval set for the first slide. Subsequent slide advances can be hanlded using the slid event as below.

    $('#myCarousel').on('slid.bs.carousel', function () {
     
        clearTimeout(t);
        var duration = $('#myCarousel').find('.active').attr('data-interval');

        t = setTimeout("$('#myCarousel').carousel('next');", duration);
    })

Hope this helps. Please to note that to have this working, use the data-interval attribute and set the desired interval in milli-seconds for each slide. e-g.

    <div class="item" data-interval="4000">


I have found this working fine with a single Carousel in the same page and have not tested this with multiple Carousels in the same page.