Wednesday, 15 August 2018

VB.NET Extending the MailMessage to have the ability to save the mail message

Problem:

The System.Net.Mail.MailMessage is badly missing the option of saving the Message as a file. Though there is a workaournd by using the SpecifiedPickupDirectory option of the SmtpClient to write the mail message ot the specific folder. This option however doesn't have flexibility in naming the files. In a multi-threaded parallel execution environment, it is difficult to identify and rename the specific files post writing to disk. There ought to be a better solution to handle this problem.

Solution:

You can extend the MailMessage class and add a Save method yourself. The Send method of the SmtpClient creates and uses MailWriter object to write out the mail message and it uses fileMailWriter when the SpecificPickupDirectory is specified as the DeliveryMethod. Create your own MailWriter object using FileStream and invoke the internal Send method, passing your MailWriter object. Check out this Code Project Article for more details. The code samples given there are for the C# language. Just in case you need, given below the same code for the Extension in VB.NET.


Imports System
Imports System.Net.Mail
Imports System.Collections.Generic
Imports System.Linq
Imports System.Text
Imports System.IO
Imports System.Reflection
Imports System.Runtime.CompilerServices

Module MailMessageExtension
    <Extension()>
    Public Sub Save(ByVal msg As MailMessage, FileName As String)

        Dim asm As Assembly = New SmtpClient().GetType().Assembly
        Dim _mailWriterType As Type = asm.GetType("System.Net.Mail.MailWriter")


        Using _fileStream As FileStream = New FileStream(FileName, FileMode.Create)


            ' Get reflection info for MailWriter contructor
            Dim _mailWriterContructor As ConstructorInfo = _mailWriterType.GetConstructor(BindingFlags.Instance Or BindingFlags.NonPublic, Nothing, New Type() {GetType(Stream)}, Nothing)

            ' Construct MailWriter object with our FileStream
            Dim _mailWriter As Object = _mailWriterContructor.Invoke(New Object() {_fileStream})

            ' Get reflection info for Send() method on MailMessage
            Dim _sendMethod As MethodInfo = New MailMessage().GetType().GetMethod("Send", BindingFlags.Instance Or BindingFlags.NonPublic)


            ' Call method passing in MailWriter

            _sendMethod.Invoke(msg, BindingFlags.Instance Or BindingFlags.NonPublic, Nothing, New Object() {_mailWriter, True, True}, Nothing)

            ' Finally get reflection info for Close() method on our MailWriter
            Dim _closeMethod As MethodInfo = _mailWriter.GetType().GetMethod("Close", BindingFlags.Instance Or BindingFlags.NonPublic)

            ' Call close method
            _closeMethod.Invoke(_mailWriter, BindingFlags.Instance Or BindingFlags.NonPublic, Nothing, New Object() {}, Nothing)
        End Using

    End Sub
End Module


You may observe that you need to create extensions as a module.

Saturday, 7 April 2018

Hypothetical Indexes in SQL Server

Problem:


While attempting to rebuild all indexes on a table, I am getting the following error:

Cannot rebuild hypothetical index '_dta_index_table_name_10_992214785__K9' online.

What is this hypothetical index and I cannot see any such indexes in the object explorer against the specific table. How can I get over this error.


By: Anonymous


Solution:


You or someone who works on the database should have used Database Tuning Advisor (DTA) to analyze the performance aspect of the tables and indexes. DTA creates hypothetical Indexes when it checks queries & tables for columns to measure the performance gain that such indexes may offer and thus come up with a recommendation. Usually when the DTA completes its analysis, it deletes all the hypothetical indexes if it cleanly finishes but in some cases, these indexes may be left over.


For a query or a stored procedure execution, after an initial recompile is triggered, the optimizer uses some of the information from these hypothetical indexes, which is out of date, and hence incorrectly determines that a recompile is needed again. During the ensuing recompiles, the information from the hypothetical indexes is never refreshed, and so the optimizer remains in a recompile loop. Hence, dropping hypothetical indexes is a better choice.


Clustered hypothetical indexes can be dropped with DROP INDEX statement. Nonclustered hypothetical indexes can be dropped with DROP STATISTICS statement.

You may find out all hypothetical indexes using this query:


WITH [hypo] AS (

SELECT QUOTENAME(SCHEMA_NAME(o.[schema_id])) +'.'+ QUOTENAME(OBJECT_NAME(i.[object_id])) AS [Table] , QUOTENAME([i].[name]) AS [Index_or_Statistics], 1 AS [Type]
FROM sys.[indexes] AS [i]
JOIN sys.[objects] AS [o] ON i.[object_id] = o.[object_id]
WHERE 1=1
AND INDEXPROPERTY(i.[object_id], i.[name], 'IsHypothetical') = 1
AND OBJECTPROPERTY([o].[object_id], 'IsUserTable') = 1

UNION ALL

SELECT QUOTENAME(SCHEMA_NAME(o.[schema_id])) +'.'+ QUOTENAME(OBJECT_NAME(o.[object_id])) AS [Table], QUOTENAME([s].[name]) AS [Index_or_Statistics], 2 AS [Type]
FROM sys.[stats] AS [s]
JOIN sys.[objects] AS [o] ON [o].[object_id] = [s].[object_id]
WHERE [s].[user_created] = 0
AND [o].[name] LIKE '[_]dta[_]%'
AND OBJECTPROPERTY([o].[object_id], 'IsUserTable') = 1
)

SELECT [hypo].[Table],[hypo].[Index_or_Statistics], 
CASE [hypo].[Type]
WHEN 1 THEN 'DROP INDEX ' + [hypo].[Index_or_Statistics] + ' ON ' + [hypo].[Table] + ';'
WHEN 2 THEN 'DROP STATISTICS ' + [hypo].[Table] + '.' + [hypo].[Index_or_Statistics] + ';'
END AS [Drop Stmt]
FROM [hypo]


Hope this helps you.

Monday, 13 March 2017

Windows Service - How To Setup Email Notification On Service Failure

Problem:

We have designed a scheduler engine, which runs as a windows service and is used for executing different kinds of scheduled tasks. At times, the service stops and we get to know that only when some users complain of not being able to see the outcome of a scheduled task. Since then we have put this scheduler under the monitoring checklist, so that the windows monitoring team have a check on this service. But it would be even more effective, if this is automated. Wonder if Windows offers an easy way of setting up an alert on service stoppage.

Solution:

Windows does offer an option to configure email notification for one or more specific events occuring. If you have built your service application to handle the exceptions and write the exception information into the windows event log, then the easier approach is to leverage the windows event notification. If you have not aready used the Windows event log, in your service application, it is recommended to do so, as windows event log is the best place to look for errors and other events. Check out Stuart Lange's article on Handling Windows Service Errors. It is a series of six articles and you may want to check out all of them. Check out the Technet article Configure Notification Options to know more about setting up email notifications using the Windows System Resource Manager.

Just in case, you don't have the option of leveraging the Windows System Resource Manager as above, then you may make use of the Recovery options under the service properties dialog. You may double click on your service on the services console window and you will see a Tab named Recovery. The Recovery option enables you to specify a recovery action three times. See the figure below:


As you may observe, you four options to choose when a service fails: Take No Action, which is the default; Restart the servive; Run a program; and Restart the computer. While Restarting the computer is not a good idea if the computer also serves various applications and services, Though you have option to specify a delay for restart and
to send out messages to other connected computers that the computer is being restarted.


But certainly Run a Program option can be leveraged to send out an email notification. You may also notice that you have option to specify different actions for the first, second and subsequent failure. It would be a good idea to to try restarting the service atleast once or twice and then try using a custom program to send out an email notification. The custom program can even be a Power Shell script.

A simple PowerShell script to send out email notification could be as below:

$Username = "MyUserName";
$Password= "MyPassword";
$message = new-object Net.Mail.MailMessage;
$message.From = "YourName@gmail.com";
$message.To.Add($email);
$message.Subject = "subject text here...";
$message.Body = "body text here...";
$smtp = new-object Net.Mail.SmtpClient("smtp.gmail.com", "587");
$smtp.EnableSSL = $true;
$smtp.Credentials = New-Object System.Net.NetworkCredential($Username, $Password);
$smtp.send($message);


While there are more ways you can handle this problem, I hope this helps you to 

Sunday, 12 March 2017

MS Excel - Copy Sum of Selected Cells

Problem:


Mirosoft Excel is a wonderful office product and is an essential tool in our work life for most of us. But still many would have not discovered its capabilities to the fullest. Here is a problem that I wanted to solve. Typically, techies don't like to do same thing repeatedly and would look for a possible shortcut for that. I have been working through multiple excel sheets, where in have to find totals for a group of cells, without any specific parameters to determine the qualifying cells. If there is a shortcut to accomplish this it would be of help to many.


Solution:


Given that there are no parameters that determine the qualifying cells, it is difficult to come up with a an algorithm to automate the selection and totalling. But it would be possible to leave the selection to the users and then facilitate the summing part. We can leverage the clipboard to achieve this. Let the users select the desired cells and then invoke the macro using the assigned short cut key combination and the total is copied into the clipboard and available for pasting any where.

Here is the macro that does the work:

Sub mySum()   
 Dim MyDataObj As New DataObject   MyDataObj.SetText Application.Sum(Selection)   MyDataObj.PutInClipboard 
End Sub

I am sure every one knows how to create a macro and assign a short cut key for it. You may find a lot of resources on creating a macro in excel.

Saturday, 11 February 2017

MS Excel - How to get rid of the GetPivotData function in formulas?

Problem:

Have you tried copying a formula involving cells within a pivot table? You may find that the the value in the target cells don't change. You may also notice that the formula doesn't refrerence the cells in the usual way like A1, C2, etc. Instead, it uses the GetPivotData function. for example when I tried creating a formula adding J4 and I4 and that both J4 and I4 within a Pivot Table. But the formula you see in the target cell is something like the one below:

=GETPIVOTDATA("Sum of Dec'16"|$A$3|"Group"|"Administrative Expenses")+GETPIVOTDATA("Sum of Nov'16"|$A$3|"Group"|"Administrative Expenses")

As copying this formula to the adjoining cell does not change the cell reference and as such the value doesn't change. How do we workaround this issue?

Solution:

I am sure while creating the formula, you would have used the mouse to select the cells referenced in the formula. Try just typing the cell references in the formula without using the mouse. For instance, just type '=J4+I4' and there you go, the formula remains as it is and at this instance you don't see the reference to the GetPivotData function. Now you copy this formula to the adjoining cells and it works as usual and no issues. So the issue is when you select the cells referenced in the formula using the mouse / touch pad.

Now why Excel behaves like this, we don't know. However, if you don't like this behavior and permanently disable this you need to do this. It's simple.

Bring up the Excel Options by clicking on File --> Options menu. May be, there are different ways of reaching out to the Excel Options in different versions of Excel. Under the Formulas Tab, you will find a check box 'Use GetPivotData functions for Pivot Table References' under Working with formulas section. Given below is a screen shot of Excel 2016.


There you go, just uncheck this checkbox and Excel won't use the GetPivotData function any more.


Saturday, 21 January 2017

Bootstrap Carousel - Different intervals for differnet slides

Problem:

Bootstrap Carousel is an easy and convenient option for implementing a slider on your website. But is there a way to advance the slides with different time intervals. For example, slide 1 will advance after 10 seconds, the second slide after 5 seconds and slide 3 to advance after 3 seconds. I came across a scirpting suggestion using the the carousel method with the 'pause' parameter. i.e. Pausing the slide advancing for amount of time computed as the slide timer as reduced by a the interval. But for some reasons this solution wasn't working for me. But I could have it working with a different approach, which is explained below, so that this will be useful for others as well.

Solution:

Instead of using the pause attribute, I tried using a script to advance the slides. i.e. advance the slides manually by calling carousel method the 'next' attribute. This can be accomplished in combination with the setTimeOut function. For e-g, something like this should help in having this working.

    var t;
    var start = $('#myCarousel').find('.active').attr('data-interval');

    t = setTimeout(function () { $('#myCarousel').carousel('next') }, start);

The block above will ensure that the first slide advances after the interval set for the first slide. Subsequent slide advances can be hanlded using the slid event as below.

    $('#myCarousel').on('slid.bs.carousel', function () {
     
        clearTimeout(t);
        var duration = $('#myCarousel').find('.active').attr('data-interval');

        t = setTimeout("$('#myCarousel').carousel('next');", duration);
    })

Hope this helps. Please to note that to have this working, use the data-interval attribute and set the desired interval in milli-seconds for each slide. e-g.

    <div class="item" data-interval="4000">


I have found this working fine with a single Carousel in the same page and have not tested this with multiple Carousels in the same page.

Saturday, 10 September 2016

ASP.NET - Setting HTML Meta tags in content pages

Problem:


Though the @Page directive in a content page allows one to specify the Description and Keywords attrubutes, the same is ignored when the page is rendered. Instead the Description and Keywords as specified in the master page is what gets rendered as part of the final html output. Is this the intended design and is there a solution to work around this issue?


Solution:


By design, the HTML Meta tags specified in the content page is ignored when the page is rendered. In this context it is important to understand the following:

  • The Master page contains the <head> tag of the page and not the content page. As such the meta tags specified in the master page will prevail.
  • The Content page derives the System.Web.UI.Page class, which though recognizes the Title attribute provided as part of the @Page directive, it does not recognize the other meta tags like description and keywords.
  • The master page and content page are dendered in teh following order:
    • Content Page PreInit event
    • Master Page Init event
    • Content Page Init event
    • Content Page Load event
    • Master Page Load event

As you may observe, while the Load event of Master page happens after that of the Content Page, the Init event of the Master page happens ahead that of the content page.  Given that the Master page loads after the content page, you can manage to use the Title attribute specified in the content page using the script tag within the <title> element, as below:

<title><%: Page.Title %></title>


You cannot however handle the Meta tags in the same way. One solution to handle the Meta tags specified in the Content page is to use a custom Page class, which extends the System.Web.UI.Page class, wherein add support to handling the Description and Keywords as input in the @Page directive. This can be accomplished by adding appropriately overriding the OnLoadComplete event of the Page class, wherein the needed Meta tags are constructed using the values specified in the @Page directive and the same are added to the Page Header.

Check out this codepage link for a sample solution.

Saturday, 9 July 2016

SSRS - Custom Period Filters

Problem:

Just wondering if the reports published on SQL Server Reporting Services can be customized to have a predefined period filters like Last Week, Last Month, Last Quarter, etc.

By: Anonymous

Solution:

You have few options to work around this, which are given below:

1. Dynamic Parameter

Basically, your underlying query or stored procedure needs the values for the From and To paramteres to apply in the where clause of the query. You can do this by first creating a mutli valued Period parameter, with values like, Last Week, Last Month, etc specified as available values. The From and To parameters can then be set up in such a way that it fetches the default value from a query, which takes the value from the Period parameter and then return the corresponding From and To values respectively. In these, the Period Parameter shall be positioned above the From and To parameters. The query can be as simple as

SELECT 
CASE 
WHEN @Period = 'LW' THEN DATEADD(D,((DATEPART(dw, GETDATE())-1)*-1)-7,GETDATE())
WHEN @PEriod = 'LM' THEN DATEADD(M,-1,DATEADD(D,(DAY(GETDATE())-1)*-1, GETDATE()))
END AS FROM_DATE

for the default values of the From parameter. You may extend this idea and use it different ways to make a parameter dynamically derive a value based on a previous parameter. Note that the order of the parameter is important as the parameters are constructed sequentially and there is nothing like an onChange event that you can think of.

2. Let the SQL Query / Procedure do the work

The second alternative is to put in a logic similar to the above within the Report Query or Stored Procedure, so that the user just selects the period filter and the SQL Server interprets it appropriately and returns the appropriate results. The only difference with this option is that the From and To Filters need not be designed in the report and the user won't see it on screen.

3. Wrap the report within an Application

Just in case, you are rendering the reports within an Application, like a ASP.NET application or a Windows Forms Application, then you can have the complete control on the Filters in the presentation layer of your application. For instance in this case, you accept a Period Filter from the user in your front end application and then transform it to an appropriate From and To dates to the ReportViewer component and get the report rendered accordingly.


Sunday, 3 July 2016

Issues in Signing a .NET Assembly using .pfx file

Problem:

I have procured a code signing certificate with a view to ensure that one of application that we intend to distribute to external users is signed so that the same can be trusted by the end users. I imported the certificate into the certificate store and used it successfully to sign the Click Once Manifest using the Signing tab in the Projec Properties dialog in Visual Studio 2013. But I could not have the assembly signed. I exported the certificate from the store as a .pfx file and tried using it for signing the assembly, but am getting issues like "Private Key not Found", while the Private key is very much present in the .pfx file.

By: Rajkumar David

Solution:

Visual Studio 2013 has known issues in handling PKCS# 12 certificate files as it cannot handle files with multilpe certificates in the CA certificate chain. Visual studio may not still consider such certificates for signing the assembly because of the KeySpec Parameter, which is usually set as AT_KEYEXCHANGE(1), whereas Visual Studio expects this to be AT_SIGNATURE(2). It is possible that while requesting the certificate, the KeySpec is set as 1 and as such the certificate is generated with the value as 1. You may verify CSR that you have submitted to the CA to check this.

OK, now what do you with that certificate? You have option to import such certificates with KeySpec set as AT_SIGNATUR. The Windows Servers from 2003 onwards have a commandline certificate import utility - certutil.exe. This command allows you to import the certificate with the right KeySpec parameter. Use the following command to do this:

certutil -importPFX -user <pfxfilename> AT_SIGNATURE

After importing the certificate using the above command into the certificate store and then export it back as .pfx file from the store for assembly signing within Visual Studio. This should resolve the given problem.

More on the CertUtil command can be found here.

Sunday, 29 November 2015

How to Create '|' (Pipe) Delimited Files in Excel

Problem:

Microsoft Excel is a very useful tool for data analysis. It supports import of data from various sources and formats into it for analysis. But, though it supports export of data in various common formats, it does not natively support export of data in a delimited text format with the delimiter other than Comma and Tab characters. This post explains how to get the excel data exported into a "|" (pipe) delimited text file.

Solution:

Excel does not directly support export or saving the data delimited with a pipe or such other characters. It supports comma delimited files (.csv) or tab delimited files though. The csv file generator however uses the List Separator as set in the windows Regional Settings as the delimiter. With this you can change this value in the regional settings and the csv file option will now produce a delimited file with the delimiter of your choice as set in the regional settings. For those not familiar with the regional settings, here is how to get this accomplished:

If you are using Windows 8 or 8.1, you will find the Regional Settings option under the "Clock, Language and Region"  category.


Click on the Additional Settings button in the Formats tab of the Regional Settings dialogue box. In the Numbers tab of the resulting dialogue box, you will find the field List Separator (Highlighted in the image. By default, it displays ","(comma). Now set it to a character that you need the files to be delimited with. For instance, if you want export a pipe delimited text file from excel, enter the charcter "|" in this field and apply the change.


You are done. Close and re-open Excel with the data that you want to export. Now use the Save As option to save the sheet as a csv file (.csv). This will now produce a text file delimited with the pipe character. Unless you regularly use pipe as the delimiter, you may want to set it back to comma, so that it does not impact any other operations that dependent on the List Separator field.


Sunday, 20 September 2015

Powershell Script for Cleaning up Old Files

Poblem:

I am working on a project that creates 100s of files every hour which has led to creation of over few thousand files in a week. Due to the very high number of files, Explorer takes so long to list the files in the folder. As this could fill up the storage pretty fast, I need to delete files older than 7 days. Please suggest me how best to accomplish this, preferably using PowerShell and leveraging the Scheduled Tasks.

By: Anonymous

Solution:


Powershell is the way to go for these kind of tasks. For deleting old files, the following script will do the job:

Get-ChildItem –Path <Base Folder> –Recurse | Where-Object CreationTime –lt (Get-Date).AddDays(-7) | Remove-Item

Replace the <Base Folder> with the actual base folder  that need to be looked up for this task. Simiarly, you may observe the from the above script, this will delete the files based on the time of creation of the file. If you want to use the last modified time, replace the CreationTime with LastWriteTime

The above script can be executed from the PowerShell prompt or can be scheduled to run automatically using the Windows Task Scheduler. There are couple of things that you should take care of while scheduling:

  • By default, the deletion will fail as the execution policy may not permit the deletion. To override this set the parameter ExecutionPolicy to bypass
  • You may want to add the parameters - noninteractive. to enable to run automatically without needing user action. 
  • Do not place the script itself in the program field, Instead save the script as a .ps1 file and pass the script file with fully qualified path as a parameter in the parameter field.

Typically, the following should be added to the parameter field:

-noninteractive –nologo -ExecutionPolicy Bypass -command "& 'c:\datafiles\cleanup.ps1'"

Needless to mention that the progrm / script field shall contain the PowerShell executable with its fully qualified path, which will be like this:

C:\Windows\System32\WindowsPowerShell\v1.0\powershell.exe
You may also want to have a look at the clean up script on the TechNet site, which has many more capabilities, like crating a log of files deleted and so on.

Friday, 26 June 2015

SSRS Report Builder 3.0 - How to avoid page breaks in Report Viewer

Problem:

The Report Viewer displays the tabular reports with pagination. This is inconvenient to users as they have to click on the page navigator to browse through the report. Is there a way to have the report viewer display all the rows in one view, so that users will find it convenient to browse through the report by just scrolloing up and down?

By: Muthu Saravanan

Solution:

Use the Interactive Size property of the report to overcome this. This property will not however show up in the Report Properties dialog. This will be available on the Properties Pane, which shows up ususally on the right side of the screen. If it is not showing up, check the options under the View menu. To have all records in single view without pagination, set the Height under Interactive Size to 0 cm.


This setting is effective for display in the report viewer only. Page breaks in print and other export formats will be based on the Page Size rather than the Interactive Size property.

Friday, 6 March 2015

Whitelisting email or domain in Gmail

Question:

How to whitelist or blacklist an email domain in gmail?

By: Radhakrishnan Ravi


Answer:

Google has a might spam handler and does a very decent job. However, if you want to put a rule to either whitelist or blacklist, use the filter options provided under settings menu. It is simple and the following steps will take you through in implementing a filter of your choice.

Choose the Settings menu from the Settings drop down menu on the top right beneath your profile picture.


Select the Filter Tab, which will list the filters and will have a link at the bottom captioned ''Create a New Filter". As you may observe, you have an option to import filters as well using the "Import Filter" link.


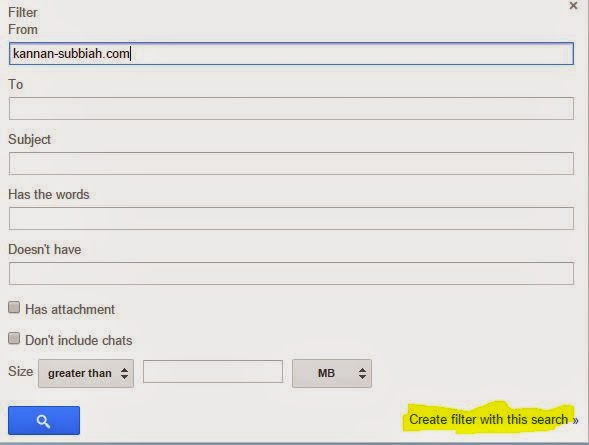
Clicking the create filter will take you to the advanced search window as in the image on the right. Alternatively this search window can be accessed using the tiny drop down icon provided on the right side of the search box within gmail. Basically, you will have to decide on the search criteria to apply the filter for. i.e, if you want to whitelist the domain kannan-subbiah.com, enter the domain name in the From field of the search window. Upon entering a valid search criteria, you will find the link "Create a filter with this search" enabled.


Click on this and you will see a Filter Dialogue window as in the image on the left. The options provided are self explanatory and choose appropriate action you want to apply for the chosen search criteria. For instance, if you want to white list the entered domain, select the option "Never send it to Spam" and then click on the Create Filter button at the bottom. Similarly, if you want to permanently delete emails from a specific sender, you may choose the delete option here.

The filters so added will appear in under the Filter tab of the settings screen. You will then have the option to remove or modify the filters  as well.

Sunday, 9 November 2014

Microsoft Expression Encoder

This post is not in response to a specific problem or question, but could be a response to a potential question from some one.

I was looking for a cost effective and easy to use tool for capturing screens and produce videos. There are many tools, in the freeware, shareware and commercial category for the purpose. But the one that I find interesting is the one from Microsoft, the Expression Encoder. While Microsoft has stopped supporting the commercial version of the product, the same is available as a free download. I am sure, many of you might know about this, but for those who are not, this post will give a glimpse, so that one can start using it and see its advantages.

Expression Encoder Pro is a component of the Expression Studio, which is currently not sold as a product. In addition to Expression Encoder Pro, the studio also bundles with it Expression Web, Expression Blend and Expression Design. Expression Web is intended for creation of responsive websites leveraging CSS3 and HTML5. Expression Blend is intended to build interactive UI for windows store applications. Expression Design, combined with Expression Blend and Visual Studio helps building innovative, user-centric, fast and fluid applications. Check out more about the changes and availability of Expression products on the microsoft site.

Let us look at what Expression Encoder can offer us. Expression Encoder 4 Screen Capture is also installed along with the Expression Encoder 4. The Screen Capture component offers you to record videos using the camera attached to the device / PC, record audio using the microphone, and to record the selected area of the screen.


On clicking the Record button, you will be prompted to select a rectangle area to capture and once done, you can continue with your actions on the screen as the recording continues.Once, done, you stop the recording and the output is produced as a .xesc file, which can be further edited using the Encoder.

To get your captured video encoded into a video output, you will perform the following using the Expression Encoder

  • Choose your project. 
  • Import your source video. 
  • Modify your video. 
  • Set preview and encoding options. 
  • Choose an output format. 
  • Render your video.
Getting used to was not very difficult and the product comes with a useful help document. The tool allows you to overlay visual still and moving image file, edit the sub titles, captions and descriptions, add audio streams, apart from allowing you to insert and cut parts of the source video.


Few of the limitations include, inabitlity to add more than one overlay, the supported output format limited to Windows Media Video (.wmv) and IIS smooth streaming. While the tool has much more capabilities, for the specific purpose of creating product demo or tutorial videos, this suits very well. As you know there are many tools out there to convert .wmv to other video formats, like .mp4.

Try it out and share your feedback here.

Thursday, 6 November 2014

Windows Steps Recorder - For Problem Reporting

Question:

I work in QA department, where reporting issues and defects with all supporting details to well describe the problem is key. We usually use a screen capture tool to capture the images, but then to assemble them as a problem report, we need to depend upon MS Word or such other tool. I am writing to you to check if there is a better tool that helps to perform this task even better.

By: Krishnan Sadasivam

Response:

If you are asking about a tool for screen capture, Snipping tool, which is part of Windows OS from version 7 onwards is a nice tool to capture parts of the screen. There is another tool which again is part of the Windows OS from version 7 upwards, which is called 'Steps Recorder'. This tool captures your actions and associated screen and produce a descriptive output, which will make it a lot easier for the problem reporter and the problem sover. Here is how it works in Windows 8 or 8.1:


  • Press Windows Key+Q to bring up the search panel on the right.
  • Type steps and you will see the "Steps Recorder" tool show up in the search results
  • Click on it and it will launch the Steps Recorder Tool

  • Click on the Record button and then start reproducing the problem you want to report. 
  • As the recording is in progress, you have the option of adding comments to certain specific area of screen by highlighting it.
  • Once done click on stop recording and your actions is compiled as multiple steps and optionally as a slide show.


  • You have option to save the steps as a compiled html and email it as well.


This free tool will certainly be handly for reporting computer software problems.

Sunday, 2 November 2014

Excel Pivot & Shortcut Keys

Question:

I understand Microsoft Excel is a good start for analytics on data. Please direct me as to how to create a basic Pivot Table. You may also share me any tutorial references to learn more on Pivot feature in Excel. Also share Short Cut keys in Excel

By: Vinay Kumar

Response:

Learning to create a Pivot is fairly easy but the tough part is to know how you want the data to be presented in the Pivot. For this you need to know a good understanding of the data on hand and what you want out of the data. For this question, I assume that you are already clear about your needs.

Here is how you can quickly get a Pivot of your Excel Data:

  • Select the data range that you want to apply Pivot on and then click on the Pivot button, which is in the Toll bar ribbon under the Insert Menu. You may also use the short cut key Alt + NV
  • This will open up the Pivot dialog window where you will have option to adjust or change your your data range (as you may observe, you can also use an external data source by choosing the appropriate option) and other options.
  • Clicking ok on this dialog window will open up the Pivot table in a new work sheet (default option) and will show the Pivot Table Fields task pane on the right side. You can drag and drop the fields into Filters, Columns, Rows and Values. 
    • FILTERS: This area contains the fields that enable you to page through the data summaries shown in the pivot table by filtering out sets of data — they act as the filters. For example, if you designate the Year field from a data list as a report filter, you can display data summaries in the pivot table for individual years or for all years represented in the data list.
    • COLUMNS: This area contains the fields that determine the arrangement of data shown in the columns of the pivot table.
    • ROWS: This area contains the fields that determine the arrangement of data shown in the rows of the pivot table.
    • VALUES: This area contains the fields that determine which data are presented in the cells of the pivot table — they are the values that are summarized in its last column (totaled by default).
  • Set these in the way you want and your Pivot table is ready.

To know more about other complex and advanced features of the Pivot Table, check here.

Here is a nice Cheat Sheet containing all the Short Cut keys for Excel. If you are a key board expert, then you will want to check out this as well.


Friday, 29 August 2014

Windows 8.1 - Switching to Local Account

Problem:

Microsoft Windows 8.1 update by default prompts to use a Microsoft live account and without noticing, I just went ahead and got signed in using my Microsoft Account. Now how do I switch to a local account?

Solution:

Yes, Windows 8.1 by default takes the users to sign in using Microsoft live account. However, if you carefull observe, you have the option to use a local account, but Microsoft ensured that you will miss that. Windows however allows users to switch between live account and local accounts.  To switch to a local account, follow these steps:


  • Goto Your Account Settings screen. You can do this by typing "Your Account" on the Windows Search screen (Windows Key + Q) .  

  • You will see a link "Disconnect" under your user account. You should click on Disconnect, which will take you through setting up your local account.

  • As a next step, Windows will have to authenticate you once again and will prompt for your current password.
  • The next step will prompt you for inputs to have your local account created. 
  • You will then be prompted for a confirmation and you click on the Singout and Finish button.


You may want to note that by switching to your local account, you will lose the synchronization with your sky drive.


Sunday, 24 August 2014

Error connecting to SMTP Server

Problem:

All of you would have faced issues when connecting to a remote server on ceertain ports. The issue will be strange to trouble shoot as the same connection works from a different network or on the server and so on. I came across such a situation when building and testing a mailing component and I experienced that the .NET SmtpClient component was encountering exception. It took considerable time for me to trouble shoot and get it resolved.

Solution:

My first take was to try whether the credentials that I have used is just fine, by creating an email account in outlook and that worked fine. I just wanted to isolate various probable areas of concern. As such I then tried using an online SMTP server test service, which was showing an error that the client must first check for incoming mails. Telnet to the mailserver on port 25 also gave an error. I then examined our mail server, whether it has any such restrictions, but I could not find any specific restriction that could cause this issue.

My next step was to examine the details of the exception for any possible clues. The inner exception nested couple of levels deep revealed the error as "An attempt was made to access a socket in a way forbidden by its access permissions"

I then tried looking for solutions online there were many posts and one solution was about to try the following and one of that could solve this issue:
  • Restart the windows firewall service
  • Reboot the problematic machine
  • Restart the “TCP/IP stack”. Run CMD as administrator, type “netsh int ip reset resetlog.txt” to reset TCP/IP.
  • Try to temporarily disable antivirus.
After a bit of analysis, I could find that in my case it was the McAfee Endpoint Protection. I could find that the rule "Prevent mass mailing worms from sending mail" was set to block connections on port 25 with certain exceptions. I added the VWDExpress.exe to the exception list and then it started working fine.

Saturday, 2 August 2014

Losing Wi-Fi connection after sleep

Problem:

I use a HP Probook Laptop at home running Windows 8.1 pro. I usually close the laptop whenever I take a short break so that I can resume my work where I left after the break. But, I find that upon opening the Laptop, the wifi does not connect and that too randomly. That means, it works fine on certain occasions and it doesn't on certain occasions. Some times, a restart helps connecting but not always. What could be the problem and how to get this resolved.

By: Lalith Venkateswaran

Solution:

This could be due to a combination of multiple issues relating to the configurations in your laptop and as well as on your router.

Upon closing the lid, the laptop goes to sleep mode and powers down the built in wifi device. Which might cause orphaned IPs at your router end and as you reconnect again and again, you might exhaust the DHCP range that your router is configured with. Check if this issue happens when you are on battery. If yes, then you may configure your power options so that your device does not get powered down, every time you close your laptop. You find this setting in the Power management tab of the wifi-adapter configuration. You may also review the advanced power settings for the wifi adaptor under the power options.

When your wifi connection fails upon wake up, you may check if you are able to connect to a different wifi network. If you don't have a different wifi network, you simply use the hotspot feature on your smartphone and try if your laptop can connect to it. If yes, then it is not just the wifi device on your laptop, it could be due to issues with your wifi router as well. Some routers may have issues in accepting connections from the same devices with the same mac id, as the previous connection might still be there. Try the following steps, which might solve your problem:


  • Try setting a shorter DHCP lease time, so that the orphaned connections get released sooner, so that your router has no problem in accepting a fresh connection.
  • Use the DHCP reservation, so that every time the laptop tries to establish a connection, the router assigns the same IP and thus no need for lease expiry / renewal.


Post a comment if this does not solve your problem.

Sunday, 29 June 2014

Administration of Vodafone HG556 Router

Question:

I have a Vodafone HG556a router, which I was using while I was in Ireland with Vodafone network. This router has a USB port and as well as an ADSL port. So I thought that this router can be used back in India with BSNL or such other ADSL Networks in India. When I login to the router with the given default password, I could only see the basic settings and I could not see menu / options to setup the mac filtering and other advanced security settings. I searched google and figured out that there will be a different credential to get into the advanced settings. I tried with the default admin credientials but it does not work. Any help that you can offer here will be of great use for me.

By: Sreekumar Rajan


Answer:

Luckily, I too have a similar router and so I am sure I can help you here. Basically, these routers are locked with the network service providers and hence for any advanced setup, you may have to reach out to their customer service, who will be able to reconfigure your router remotely. Don't worry, there is a way to get the admin credentials and you do not have to reach out to the customer service team of Vodafone (overseas).


I assume that you have your basic user credentials. If not, you may perform a hard reset of the router and then look for the credentials
on the back of the router. Usually, the default basic credentials are mentioned in the router itself, if not you may consult the user guide if any that came with the router. The defualt user name is 'vodafone' and the default password is also the same - 'vodafone'. Refer the image, which is that of my Vodafone router and you can see the defaults printed there in.


You connect your router to your laptop or desktop using ethernet cable and login into the web administration of the router using the default IP of 192.168.0.1. Alternatively, you may connect through wifi as well, using the default SSID and the WPA as printed at the back of the router. Type the URL http://192.168.0.1/en_US/backupsettings.conf on the browser after logging in with the basic credentials.


This will prompt you to download the settings file and depending on your browser settings, allow the download into a desired location. This settings file is basically in xml format and so, you may open this using notepad or wordpad. Search for the word 'syspassword' and you will see the admin password as in this image. You may observe that the value for the key sysPassword in this case is "VF-456gIr". This is the password for the user 'admin'. Log out of the basic user login and then login again using the admin credentials as retrieved above and you are now on course to perform advanced setup tasks on your router.

It may be possible that the firmware version of your router may be different and in that case, there is a possibility that this technique might not work for you. If so, share with me more details about your router and I can see if some help is available elsewhere.