Sunday, 9 November 2014

Microsoft Expression Encoder

This post is not in response to a specific problem or question, but could be a response to a potential question from some one.

I was looking for a cost effective and easy to use tool for capturing screens and produce videos. There are many tools, in the freeware, shareware and commercial category for the purpose. But the one that I find interesting is the one from Microsoft, the Expression Encoder. While Microsoft has stopped supporting the commercial version of the product, the same is available as a free download. I am sure, many of you might know about this, but for those who are not, this post will give a glimpse, so that one can start using it and see its advantages.

Expression Encoder Pro is a component of the Expression Studio, which is currently not sold as a product. In addition to Expression Encoder Pro, the studio also bundles with it Expression Web, Expression Blend and Expression Design. Expression Web is intended for creation of responsive websites leveraging CSS3 and HTML5. Expression Blend is intended to build interactive UI for windows store applications. Expression Design, combined with Expression Blend and Visual Studio helps building innovative, user-centric, fast and fluid applications. Check out more about the changes and availability of Expression products on the microsoft site.

Let us look at what Expression Encoder can offer us. Expression Encoder 4 Screen Capture is also installed along with the Expression Encoder 4. The Screen Capture component offers you to record videos using the camera attached to the device / PC, record audio using the microphone, and to record the selected area of the screen.


On clicking the Record button, you will be prompted to select a rectangle area to capture and once done, you can continue with your actions on the screen as the recording continues.Once, done, you stop the recording and the output is produced as a .xesc file, which can be further edited using the Encoder.

To get your captured video encoded into a video output, you will perform the following using the Expression Encoder

  • Choose your project. 
  • Import your source video. 
  • Modify your video. 
  • Set preview and encoding options. 
  • Choose an output format. 
  • Render your video.
Getting used to was not very difficult and the product comes with a useful help document. The tool allows you to overlay visual still and moving image file, edit the sub titles, captions and descriptions, add audio streams, apart from allowing you to insert and cut parts of the source video.


Few of the limitations include, inabitlity to add more than one overlay, the supported output format limited to Windows Media Video (.wmv) and IIS smooth streaming. While the tool has much more capabilities, for the specific purpose of creating product demo or tutorial videos, this suits very well. As you know there are many tools out there to convert .wmv to other video formats, like .mp4.

Try it out and share your feedback here.

Thursday, 6 November 2014

Windows Steps Recorder - For Problem Reporting

Question:

I work in QA department, where reporting issues and defects with all supporting details to well describe the problem is key. We usually use a screen capture tool to capture the images, but then to assemble them as a problem report, we need to depend upon MS Word or such other tool. I am writing to you to check if there is a better tool that helps to perform this task even better.

By: Krishnan Sadasivam

Response:

If you are asking about a tool for screen capture, Snipping tool, which is part of Windows OS from version 7 onwards is a nice tool to capture parts of the screen. There is another tool which again is part of the Windows OS from version 7 upwards, which is called 'Steps Recorder'. This tool captures your actions and associated screen and produce a descriptive output, which will make it a lot easier for the problem reporter and the problem sover. Here is how it works in Windows 8 or 8.1:


  • Press Windows Key+Q to bring up the search panel on the right.
  • Type steps and you will see the "Steps Recorder" tool show up in the search results
  • Click on it and it will launch the Steps Recorder Tool

  • Click on the Record button and then start reproducing the problem you want to report. 
  • As the recording is in progress, you have the option of adding comments to certain specific area of screen by highlighting it.
  • Once done click on stop recording and your actions is compiled as multiple steps and optionally as a slide show.


  • You have option to save the steps as a compiled html and email it as well.


This free tool will certainly be handly for reporting computer software problems.

Sunday, 2 November 2014

Excel Pivot & Shortcut Keys

Question:

I understand Microsoft Excel is a good start for analytics on data. Please direct me as to how to create a basic Pivot Table. You may also share me any tutorial references to learn more on Pivot feature in Excel. Also share Short Cut keys in Excel

By: Vinay Kumar

Response:

Learning to create a Pivot is fairly easy but the tough part is to know how you want the data to be presented in the Pivot. For this you need to know a good understanding of the data on hand and what you want out of the data. For this question, I assume that you are already clear about your needs.

Here is how you can quickly get a Pivot of your Excel Data:

  • Select the data range that you want to apply Pivot on and then click on the Pivot button, which is in the Toll bar ribbon under the Insert Menu. You may also use the short cut key Alt + NV
  • This will open up the Pivot dialog window where you will have option to adjust or change your your data range (as you may observe, you can also use an external data source by choosing the appropriate option) and other options.
  • Clicking ok on this dialog window will open up the Pivot table in a new work sheet (default option) and will show the Pivot Table Fields task pane on the right side. You can drag and drop the fields into Filters, Columns, Rows and Values. 
    • FILTERS: This area contains the fields that enable you to page through the data summaries shown in the pivot table by filtering out sets of data — they act as the filters. For example, if you designate the Year field from a data list as a report filter, you can display data summaries in the pivot table for individual years or for all years represented in the data list.
    • COLUMNS: This area contains the fields that determine the arrangement of data shown in the columns of the pivot table.
    • ROWS: This area contains the fields that determine the arrangement of data shown in the rows of the pivot table.
    • VALUES: This area contains the fields that determine which data are presented in the cells of the pivot table — they are the values that are summarized in its last column (totaled by default).
  • Set these in the way you want and your Pivot table is ready.

To know more about other complex and advanced features of the Pivot Table, check here.

Here is a nice Cheat Sheet containing all the Short Cut keys for Excel. If you are a key board expert, then you will want to check out this as well.


Friday, 29 August 2014

Windows 8.1 - Switching to Local Account

Problem:

Microsoft Windows 8.1 update by default prompts to use a Microsoft live account and without noticing, I just went ahead and got signed in using my Microsoft Account. Now how do I switch to a local account?

Solution:

Yes, Windows 8.1 by default takes the users to sign in using Microsoft live account. However, if you carefull observe, you have the option to use a local account, but Microsoft ensured that you will miss that. Windows however allows users to switch between live account and local accounts.  To switch to a local account, follow these steps:


  • Goto Your Account Settings screen. You can do this by typing "Your Account" on the Windows Search screen (Windows Key + Q) .  

  • You will see a link "Disconnect" under your user account. You should click on Disconnect, which will take you through setting up your local account.

  • As a next step, Windows will have to authenticate you once again and will prompt for your current password.
  • The next step will prompt you for inputs to have your local account created. 
  • You will then be prompted for a confirmation and you click on the Singout and Finish button.


You may want to note that by switching to your local account, you will lose the synchronization with your sky drive.


Sunday, 24 August 2014

Error connecting to SMTP Server

Problem:

All of you would have faced issues when connecting to a remote server on ceertain ports. The issue will be strange to trouble shoot as the same connection works from a different network or on the server and so on. I came across such a situation when building and testing a mailing component and I experienced that the .NET SmtpClient component was encountering exception. It took considerable time for me to trouble shoot and get it resolved.

Solution:

My first take was to try whether the credentials that I have used is just fine, by creating an email account in outlook and that worked fine. I just wanted to isolate various probable areas of concern. As such I then tried using an online SMTP server test service, which was showing an error that the client must first check for incoming mails. Telnet to the mailserver on port 25 also gave an error. I then examined our mail server, whether it has any such restrictions, but I could not find any specific restriction that could cause this issue.

My next step was to examine the details of the exception for any possible clues. The inner exception nested couple of levels deep revealed the error as "An attempt was made to access a socket in a way forbidden by its access permissions"

I then tried looking for solutions online there were many posts and one solution was about to try the following and one of that could solve this issue:
  • Restart the windows firewall service
  • Reboot the problematic machine
  • Restart the “TCP/IP stack”. Run CMD as administrator, type “netsh int ip reset resetlog.txt” to reset TCP/IP.
  • Try to temporarily disable antivirus.
After a bit of analysis, I could find that in my case it was the McAfee Endpoint Protection. I could find that the rule "Prevent mass mailing worms from sending mail" was set to block connections on port 25 with certain exceptions. I added the VWDExpress.exe to the exception list and then it started working fine.

Saturday, 2 August 2014

Losing Wi-Fi connection after sleep

Problem:

I use a HP Probook Laptop at home running Windows 8.1 pro. I usually close the laptop whenever I take a short break so that I can resume my work where I left after the break. But, I find that upon opening the Laptop, the wifi does not connect and that too randomly. That means, it works fine on certain occasions and it doesn't on certain occasions. Some times, a restart helps connecting but not always. What could be the problem and how to get this resolved.

By: Lalith Venkateswaran

Solution:

This could be due to a combination of multiple issues relating to the configurations in your laptop and as well as on your router.

Upon closing the lid, the laptop goes to sleep mode and powers down the built in wifi device. Which might cause orphaned IPs at your router end and as you reconnect again and again, you might exhaust the DHCP range that your router is configured with. Check if this issue happens when you are on battery. If yes, then you may configure your power options so that your device does not get powered down, every time you close your laptop. You find this setting in the Power management tab of the wifi-adapter configuration. You may also review the advanced power settings for the wifi adaptor under the power options.

When your wifi connection fails upon wake up, you may check if you are able to connect to a different wifi network. If you don't have a different wifi network, you simply use the hotspot feature on your smartphone and try if your laptop can connect to it. If yes, then it is not just the wifi device on your laptop, it could be due to issues with your wifi router as well. Some routers may have issues in accepting connections from the same devices with the same mac id, as the previous connection might still be there. Try the following steps, which might solve your problem:


  • Try setting a shorter DHCP lease time, so that the orphaned connections get released sooner, so that your router has no problem in accepting a fresh connection.
  • Use the DHCP reservation, so that every time the laptop tries to establish a connection, the router assigns the same IP and thus no need for lease expiry / renewal.


Post a comment if this does not solve your problem.

Sunday, 29 June 2014

Administration of Vodafone HG556 Router

Question:

I have a Vodafone HG556a router, which I was using while I was in Ireland with Vodafone network. This router has a USB port and as well as an ADSL port. So I thought that this router can be used back in India with BSNL or such other ADSL Networks in India. When I login to the router with the given default password, I could only see the basic settings and I could not see menu / options to setup the mac filtering and other advanced security settings. I searched google and figured out that there will be a different credential to get into the advanced settings. I tried with the default admin credientials but it does not work. Any help that you can offer here will be of great use for me.

By: Sreekumar Rajan


Answer:

Luckily, I too have a similar router and so I am sure I can help you here. Basically, these routers are locked with the network service providers and hence for any advanced setup, you may have to reach out to their customer service, who will be able to reconfigure your router remotely. Don't worry, there is a way to get the admin credentials and you do not have to reach out to the customer service team of Vodafone (overseas).


I assume that you have your basic user credentials. If not, you may perform a hard reset of the router and then look for the credentials
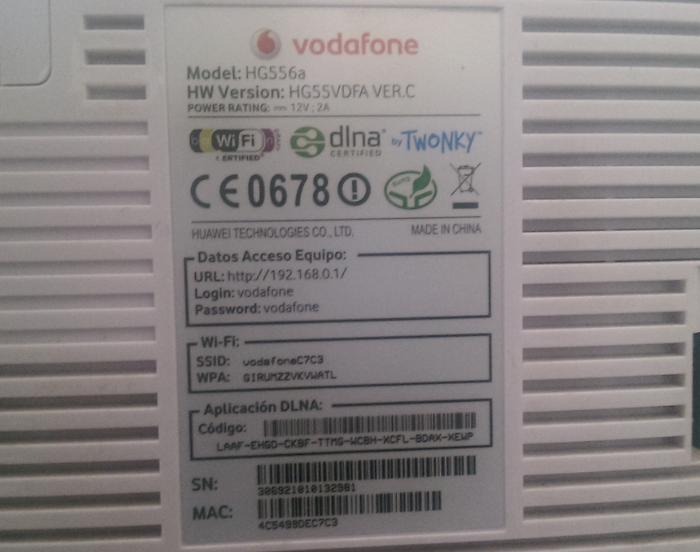
on the back of the router. Usually, the default basic credentials are mentioned in the router itself, if not you may consult the user guide if any that came with the router. The defualt user name is 'vodafone' and the default password is also the same - 'vodafone'. Refer the image, which is that of my Vodafone router and you can see the defaults printed there in.


You connect your router to your laptop or desktop using ethernet cable and login into the web administration of the router using the default IP of 192.168.0.1. Alternatively, you may connect through wifi as well, using the default SSID and the WPA as printed at the back of the router. Type the URL http://192.168.0.1/en_US/backupsettings.conf on the browser after logging in with the basic credentials.


This will prompt you to download the settings file and depending on your browser settings, allow the download into a desired location. This settings file is basically in xml format and so, you may open this using notepad or wordpad. Search for the word 'syspassword' and you will see the admin password as in this image. You may observe that the value for the key sysPassword in this case is "VF-456gIr". This is the password for the user 'admin'. Log out of the basic user login and then login again using the admin credentials as retrieved above and you are now on course to perform advanced setup tasks on your router.

It may be possible that the firmware version of your router may be different and in that case, there is a possibility that this technique might not work for you. If so, share with me more details about your router and I can see if some help is available elsewhere.