Sunday, 29 November 2015

How to Create '|' (Pipe) Delimited Files in Excel

Problem:

Microsoft Excel is a very useful tool for data analysis. It supports import of data from various sources and formats into it for analysis. But, though it supports export of data in various common formats, it does not natively support export of data in a delimited text format with the delimiter other than Comma and Tab characters. This post explains how to get the excel data exported into a "|" (pipe) delimited text file.

Solution:

Excel does not directly support export or saving the data delimited with a pipe or such other characters. It supports comma delimited files (.csv) or tab delimited files though. The csv file generator however uses the List Separator as set in the windows Regional Settings as the delimiter. With this you can change this value in the regional settings and the csv file option will now produce a delimited file with the delimiter of your choice as set in the regional settings. For those not familiar with the regional settings, here is how to get this accomplished:

If you are using Windows 8 or 8.1, you will find the Regional Settings option under the "Clock, Language and Region"  category.


Click on the Additional Settings button in the Formats tab of the Regional Settings dialogue box. In the Numbers tab of the resulting dialogue box, you will find the field List Separator (Highlighted in the image. By default, it displays ","(comma). Now set it to a character that you need the files to be delimited with. For instance, if you want export a pipe delimited text file from excel, enter the charcter "|" in this field and apply the change.


You are done. Close and re-open Excel with the data that you want to export. Now use the Save As option to save the sheet as a csv file (.csv). This will now produce a text file delimited with the pipe character. Unless you regularly use pipe as the delimiter, you may want to set it back to comma, so that it does not impact any other operations that dependent on the List Separator field.


Sunday, 20 September 2015

Powershell Script for Cleaning up Old Files

Poblem:

I am working on a project that creates 100s of files every hour which has led to creation of over few thousand files in a week. Due to the very high number of files, Explorer takes so long to list the files in the folder. As this could fill up the storage pretty fast, I need to delete files older than 7 days. Please suggest me how best to accomplish this, preferably using PowerShell and leveraging the Scheduled Tasks.

By: Anonymous

Solution:


Powershell is the way to go for these kind of tasks. For deleting old files, the following script will do the job:

Get-ChildItem –Path <Base Folder> –Recurse | Where-Object CreationTime –lt (Get-Date).AddDays(-7) | Remove-Item

Replace the <Base Folder> with the actual base folder  that need to be looked up for this task. Simiarly, you may observe the from the above script, this will delete the files based on the time of creation of the file. If you want to use the last modified time, replace the CreationTime with LastWriteTime

The above script can be executed from the PowerShell prompt or can be scheduled to run automatically using the Windows Task Scheduler. There are couple of things that you should take care of while scheduling:

  • By default, the deletion will fail as the execution policy may not permit the deletion. To override this set the parameter ExecutionPolicy to bypass
  • You may want to add the parameters - noninteractive. to enable to run automatically without needing user action. 
  • Do not place the script itself in the program field, Instead save the script as a .ps1 file and pass the script file with fully qualified path as a parameter in the parameter field.

Typically, the following should be added to the parameter field:

-noninteractive –nologo -ExecutionPolicy Bypass -command "& 'c:\datafiles\cleanup.ps1'"

Needless to mention that the progrm / script field shall contain the PowerShell executable with its fully qualified path, which will be like this:

C:\Windows\System32\WindowsPowerShell\v1.0\powershell.exe
You may also want to have a look at the clean up script on the TechNet site, which has many more capabilities, like crating a log of files deleted and so on.

Friday, 26 June 2015

SSRS Report Builder 3.0 - How to avoid page breaks in Report Viewer

Problem:

The Report Viewer displays the tabular reports with pagination. This is inconvenient to users as they have to click on the page navigator to browse through the report. Is there a way to have the report viewer display all the rows in one view, so that users will find it convenient to browse through the report by just scrolloing up and down?

By: Muthu Saravanan

Solution:

Use the Interactive Size property of the report to overcome this. This property will not however show up in the Report Properties dialog. This will be available on the Properties Pane, which shows up ususally on the right side of the screen. If it is not showing up, check the options under the View menu. To have all records in single view without pagination, set the Height under Interactive Size to 0 cm.


This setting is effective for display in the report viewer only. Page breaks in print and other export formats will be based on the Page Size rather than the Interactive Size property.

Friday, 6 March 2015

Whitelisting email or domain in Gmail

Question:

How to whitelist or blacklist an email domain in gmail?

By: Radhakrishnan Ravi


Answer:

Google has a might spam handler and does a very decent job. However, if you want to put a rule to either whitelist or blacklist, use the filter options provided under settings menu. It is simple and the following steps will take you through in implementing a filter of your choice.

Choose the Settings menu from the Settings drop down menu on the top right beneath your profile picture.


Select the Filter Tab, which will list the filters and will have a link at the bottom captioned ''Create a New Filter". As you may observe, you have an option to import filters as well using the "Import Filter" link.


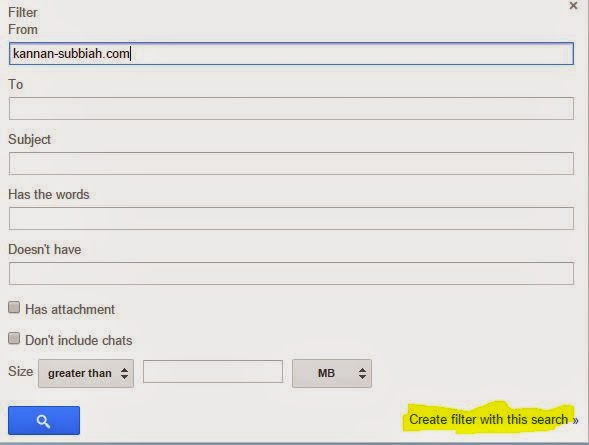
Clicking the create filter will take you to the advanced search window as in the image on the right. Alternatively this search window can be accessed using the tiny drop down icon provided on the right side of the search box within gmail. Basically, you will have to decide on the search criteria to apply the filter for. i.e, if you want to whitelist the domain kannan-subbiah.com, enter the domain name in the From field of the search window. Upon entering a valid search criteria, you will find the link "Create a filter with this search" enabled.


Click on this and you will see a Filter Dialogue window as in the image on the left. The options provided are self explanatory and choose appropriate action you want to apply for the chosen search criteria. For instance, if you want to white list the entered domain, select the option "Never send it to Spam" and then click on the Create Filter button at the bottom. Similarly, if you want to permanently delete emails from a specific sender, you may choose the delete option here.

The filters so added will appear in under the Filter tab of the settings screen. You will then have the option to remove or modify the filters  as well.

Sunday, 9 November 2014

Microsoft Expression Encoder

This post is not in response to a specific problem or question, but could be a response to a potential question from some one.

I was looking for a cost effective and easy to use tool for capturing screens and produce videos. There are many tools, in the freeware, shareware and commercial category for the purpose. But the one that I find interesting is the one from Microsoft, the Expression Encoder. While Microsoft has stopped supporting the commercial version of the product, the same is available as a free download. I am sure, many of you might know about this, but for those who are not, this post will give a glimpse, so that one can start using it and see its advantages.

Expression Encoder Pro is a component of the Expression Studio, which is currently not sold as a product. In addition to Expression Encoder Pro, the studio also bundles with it Expression Web, Expression Blend and Expression Design. Expression Web is intended for creation of responsive websites leveraging CSS3 and HTML5. Expression Blend is intended to build interactive UI for windows store applications. Expression Design, combined with Expression Blend and Visual Studio helps building innovative, user-centric, fast and fluid applications. Check out more about the changes and availability of Expression products on the microsoft site.

Let us look at what Expression Encoder can offer us. Expression Encoder 4 Screen Capture is also installed along with the Expression Encoder 4. The Screen Capture component offers you to record videos using the camera attached to the device / PC, record audio using the microphone, and to record the selected area of the screen.


On clicking the Record button, you will be prompted to select a rectangle area to capture and once done, you can continue with your actions on the screen as the recording continues.Once, done, you stop the recording and the output is produced as a .xesc file, which can be further edited using the Encoder.

To get your captured video encoded into a video output, you will perform the following using the Expression Encoder

  • Choose your project. 
  • Import your source video. 
  • Modify your video. 
  • Set preview and encoding options. 
  • Choose an output format. 
  • Render your video.
Getting used to was not very difficult and the product comes with a useful help document. The tool allows you to overlay visual still and moving image file, edit the sub titles, captions and descriptions, add audio streams, apart from allowing you to insert and cut parts of the source video.


Few of the limitations include, inabitlity to add more than one overlay, the supported output format limited to Windows Media Video (.wmv) and IIS smooth streaming. While the tool has much more capabilities, for the specific purpose of creating product demo or tutorial videos, this suits very well. As you know there are many tools out there to convert .wmv to other video formats, like .mp4.

Try it out and share your feedback here.

Thursday, 6 November 2014

Windows Steps Recorder - For Problem Reporting

Question:

I work in QA department, where reporting issues and defects with all supporting details to well describe the problem is key. We usually use a screen capture tool to capture the images, but then to assemble them as a problem report, we need to depend upon MS Word or such other tool. I am writing to you to check if there is a better tool that helps to perform this task even better.

By: Krishnan Sadasivam

Response:

If you are asking about a tool for screen capture, Snipping tool, which is part of Windows OS from version 7 onwards is a nice tool to capture parts of the screen. There is another tool which again is part of the Windows OS from version 7 upwards, which is called 'Steps Recorder'. This tool captures your actions and associated screen and produce a descriptive output, which will make it a lot easier for the problem reporter and the problem sover. Here is how it works in Windows 8 or 8.1:


  • Press Windows Key+Q to bring up the search panel on the right.
  • Type steps and you will see the "Steps Recorder" tool show up in the search results
  • Click on it and it will launch the Steps Recorder Tool

  • Click on the Record button and then start reproducing the problem you want to report. 
  • As the recording is in progress, you have the option of adding comments to certain specific area of screen by highlighting it.
  • Once done click on stop recording and your actions is compiled as multiple steps and optionally as a slide show.


  • You have option to save the steps as a compiled html and email it as well.


This free tool will certainly be handly for reporting computer software problems.

Sunday, 2 November 2014

Excel Pivot & Shortcut Keys

Question:

I understand Microsoft Excel is a good start for analytics on data. Please direct me as to how to create a basic Pivot Table. You may also share me any tutorial references to learn more on Pivot feature in Excel. Also share Short Cut keys in Excel

By: Vinay Kumar

Response:

Learning to create a Pivot is fairly easy but the tough part is to know how you want the data to be presented in the Pivot. For this you need to know a good understanding of the data on hand and what you want out of the data. For this question, I assume that you are already clear about your needs.

Here is how you can quickly get a Pivot of your Excel Data:

  • Select the data range that you want to apply Pivot on and then click on the Pivot button, which is in the Toll bar ribbon under the Insert Menu. You may also use the short cut key Alt + NV
  • This will open up the Pivot dialog window where you will have option to adjust or change your your data range (as you may observe, you can also use an external data source by choosing the appropriate option) and other options.
  • Clicking ok on this dialog window will open up the Pivot table in a new work sheet (default option) and will show the Pivot Table Fields task pane on the right side. You can drag and drop the fields into Filters, Columns, Rows and Values. 
    • FILTERS: This area contains the fields that enable you to page through the data summaries shown in the pivot table by filtering out sets of data — they act as the filters. For example, if you designate the Year field from a data list as a report filter, you can display data summaries in the pivot table for individual years or for all years represented in the data list.
    • COLUMNS: This area contains the fields that determine the arrangement of data shown in the columns of the pivot table.
    • ROWS: This area contains the fields that determine the arrangement of data shown in the rows of the pivot table.
    • VALUES: This area contains the fields that determine which data are presented in the cells of the pivot table — they are the values that are summarized in its last column (totaled by default).
  • Set these in the way you want and your Pivot table is ready.

To know more about other complex and advanced features of the Pivot Table, check here.

Here is a nice Cheat Sheet containing all the Short Cut keys for Excel. If you are a key board expert, then you will want to check out this as well.